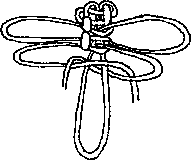
 The Dragonfly Knot.
| I first saw this Chinese ornamental knot
in 1993 when a Scout in our Jamboree troop was given one as a friendship
gift by a Scout from Taiwan. It is elegant in its form representing this
ancient creature of the order odonata.
The dragonfly is a living fossil and has fascinated me since I was a child. It can make an interesting collection as a knot by experimenting with materials and size. I have tied these in a variety of materials from dental floss (quite small) to quarter inch sisal (what a wing span). This version is simply tied with square knotting as in macrame. It is referred to as flat knotting in Chinese ornamental knotting. The tricky part is working out the wing loops and of course getting the tension right to hold the form. This comes with practice. A more elaborate version is found in the book Chinese Knotting by Lydia Chen. It can be an interesting camp craft for idle time to keep young hands busy. The exact amount of material required depends of course on the material used but you can start with about 2 feet if you are using common twine. Rule of thumb is more length for larger material and less for smaller material. Too much is always better than to little in this case. Thanks for assistance from Tzu-ni Yang and Ming Jyh-Chen of Taipei. Tzu-ni Yang adds beads for eyes at step 2 to her version. Ming Jyh-Chen (whose illustrations I have adapted here) leaves a longer open body loop and uses only knotting for the head. |
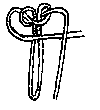
| 1. Double the cord to provide two equal length "legs". |
|
| 2. Let the ends fall as shown leaving
the center bight to the length of the dragon fly that you are making. This
will be the length of the body.
You may chose to add beads at the top of the "M" to form eyes for your creation. |
 |
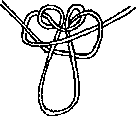
| 3. Bring right leg over and under as shown. |
 |
| 4. Bring left leg behind the body bight and through the loop as shown. |
 |
| 5. This repeats step 3 in the reverse direction |
 |
| 6. This repeats step 4 in the reverse direction. A complete square knot is formed. You may chose to do one or two complete square knots to form the head of the dragonfly. |
 |
| 7. The first wing pair is formed as in step three. Allow enough length to produce a proper wing to body proportion. |
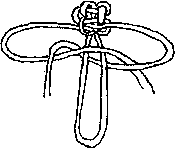 |
| 8. Complete the square knot as in step 4. Take care in tightening the knot to allow the wing lengths to stay equal. Tighten carefully and slide the knot up the body loop to the desired position. |
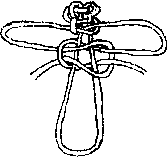 |
| 9. Add a second wing set as in step 7
and step 8.
Tighten the second wing set and move to position. The body is then completed by square knotting as in steps 3 through 6 above down the length of the body loop. Tighten carefully as you go. Ending can be completed by trimming loose ends and applying a dot of glue to secure. |
 |
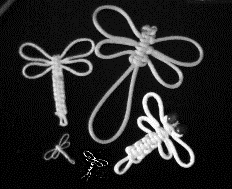
| These are some actual results: Tzu-ni Yang tied the lower right with bead eyes, Ming Jyh-Chen provided the one with the large tail loop and the rest are mine. |
 |
| If you would like to try the Dragonfly Challenge --- Click here! |
| You can find out more about the dragonfly by visiting the Iowa State Entomology Index of Internet Resources. For images and information about real Texas dragonflies visit The Digital Dragonfly. |
Rev 02SEP12