| Most backpacks come with a bit of cord tied in a simple
overhand knot on each zipper pull. The idea being to provide an easy
access to the zipper in the dark or at other time when it is difficult
to reach the zipper tab.
However, these things tend to come untied and are just plain uninteresting. An alternative is to replace these with something a bit more creative and two options are offered here. They are based on the simple technique of square knotting from macramé. By using this technique and a bit of cord you can produce two forms, one flat and one spiral pattern. The amount of cord is up to the size and length of pull you wish to make. |
| 1. Double the cord to provide two equal length "legs". |
|
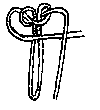
| 2. Let the ends fall as shown leaving the center
bight to the length of the pull that you are making. This will be the length
of the body.
You may chose to add beads at the top of the "M" to decorate your creation. |
 |
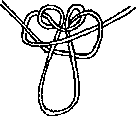
| 3. Bring right leg over and under as shown. |
 |
| 4. Bring left leg behind the body bight and through
the loop as shown. Tighten and continue in the form as 3 and
4 to produce a spiral form.
Proceed to steps 5 and 6 to produce the flat form. |
 |
| 5. This repeats step 3 in the reverse direction. |
 |
| 6. This repeats step 4 in the reverse direction. A complete square knot is formed. Continue making square knots until the desired length is achieved. This will produce the flat form shown below. |
 |
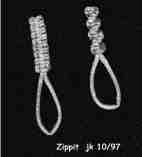
| These are the resulting pulls in both the flat and spiral form. |
 |
| Another knot that may be used for this purpose it the friendship or lanyard knot. |